By GERRY BALIÑA RULLODA, Valenzuela, Philippines. Senior Maintenance Supervisor, Napco Modern Plastic Product Company, Dammam, Kingdom Of Saudi Arabia.
I was always wondering what would be the best use of a Mercury Tilt Switch from an old air-conditioning temperature controller in our plant junkyard. For years, it lay there gathering Arabian dust. Every time I went salvaging for old spare parts on our junkyard, it would always catch my eye. The size is approximately 40x10mm with a pointed end. It looks like an ordinary torch bulb attached to a some kind of Bi-metallic spring.
While playing with it one day, our forklift driver suddenly dumps a crate nearby (loaded with heavy cooling cylinder), suddenly as the mercury danced like a sea wave an idea came to me, “Why not make it a vibration or motion monitor for car?”
I immediately rushed back to my office, set-up my Proton Board and carefully connected the mercury tilt switch (mercury is a toxic chemical and it needs careful handling!). After some a bit of coding and bit of trial and error I discovered the best solution was a four-tilt switch arrangement with them laid out in a NORTH, SOUTH, EAST & WEST orientation. Thus SmartCarBuddy was born.
To make it SMARTER as the name suggest, I decided to incorporate a SMS messaging system to alert the car owner when a burglar starts pestering your car. Err how do I do that? To tell you the truth I have no idea about the GSM Protocol. I did once try it using a Chinese made data cable from a local market, but with no luck. But because I love challenge I became more determined to learn it.
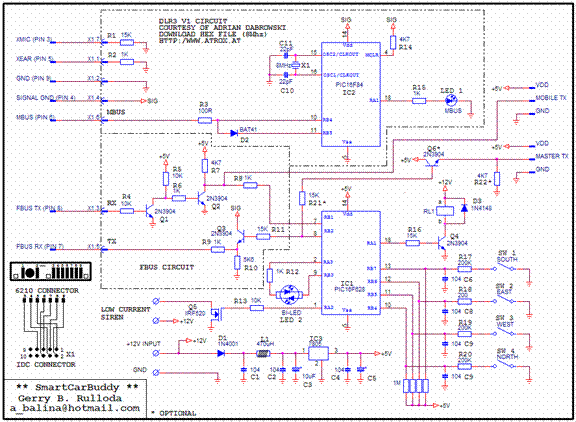
Surfing the web lead me to the ATROX web site of ADRIAN DABROWSKI. Definatly one of the benefits of the Internet, it's capability to search information from many sources. I discovered the NOKIA 6210 has an internal modem and you can communicate to it using the well-known AT COMMANDs. I have a 6210! So enthused with the posibilitys I constructed the DLR3. I strongly suggest you visit the site before trying to build this project.
I will spare you the frustrations I encountered during construction and learning the AT COMMANDs, serfice to say hyper terminal was involved! Instead let’s go direct to the PIC to DLR3 to SLAVE phone trials.
I used a 16F876 running at 4Mhz and a 2x40 LCD during this trials
After setting Declares and set the baud to 9600 (standard communication baud rate I supposed). I send HSEROUT [“AT”, 13] and the phone answered with AT13101310“OK”1310.
Where 13 is Carriage Return and 10 is the Line Feed
Perfect! The PIC communicates with the phone and displays it to my LCD.
I then change the crystal to 20Mhz, and the phone communicates up to 115200 without any problem.
The next AT COMMAND I sent was
HSEROUT [“AT+CMGR=1”,13] and the phone answered with
AT+CMGR=1^^*+CMGR: 1,,26^*0791695650309299040C91695620141006000040906
11132602107D0E493F904C500^*^*OK^*
Where ^ is CR, * is LF (I wrote the ^* to make it easier to read)
WHOOHH! It is in PDU (Protocol Description Unit) Format
Learning PDU format is quite tricky. A learner should be serious enough to understand the sub fields of the format. It used different encoding, but the important thing is it holds all the needed data. To name a few, it holds the “service center number”, “origin number”, “ nation codes”, “data scheme”, “time stamp”, “sender number”, and the “user data” where the message is stored.
Here’s the AT COMMAND I’d used in this project
AT+CMGF=0 ………………………………… Instruct the phone to use PDU Mode
AT+CMGF=1 ………………………………… Instruct the phone to use TEXT Mode
AT+CMGW=1 ………………………………… Write message at Sim memory location 1
AT+CMGR=1 ………………………………… Read Sim memory location 1
AT+CMSS=1,”Phone number”,129 …………… Forward message located in Sim memory 1
AT+CMGD=1;+CMGD=2 ……………………. Delete Sime memory location 1 to 2
AT+CBC ………………………………………. Check Phone Battery Status
For security reason and to make it user friendly, I decided to make the SET-UP via SMS messaging and dropped the idea of using Push button for entering mobile numbers, passcode… etc…..
First of all, I would like to remind you that I am not a seasoned programmer. I am just a hobbyist.
After connecting the SmartCarBuddy to 12V(Car Batt) power supply, the MASTER_PIC (16F628) start to initialize and continuously check the presence of the SLAVE_PHONE by sending AT COMMAND via FBUS . At the same time the DLR3 and FBUS is disabled. Once you plug a SLAVE_PHONE (6210) to the DLR3 MBUS Port, Pin 3 (XMIC) of the SLAVE_PHONE is held low via R1. The SLAVE_PHONE then switches the power to Pin 4 (SIGNAL-GND), thus powering the DLR3 PIC (16F84) and at the same time enabling FBUS via Q3 collector. Q1 drives Q2 at low voltage and Q2 output the required TTL voltage level to the MASTER_PIC. It is configured as an Inverter and so with Q3 replacing the well known MAX232 Chip. Now the SLAVE_PHONE and DLR3 start sending MBUS-frames to each other. Once a connection is established, the MBUS LED starts to blink to show that the SLAVE_PHONE and DLR3 are on-line. On the background, the MASTER_PIC, that is monitoring the presence of the SLAVE_PHONE, will blink the BI-LED when a connection is established via FBUS. Once a link is establish between the MASTER_PIC and the SLAVE_PHONE, the MASTER_PIC start to delete the SLAVE_PHONE SIM card starting from memory location 1 and 2. This location is reserve for tracking the incoming USER COMMAND messages.
When first commissioned, the default PASSCODE is an 8 character (including space) PIOLO V1 (Name of my pet dog. Please don’t alter this to credit me. You can change it later via SMS). To make yourself the RECIPIENT or the USER, you have to send the PASSCODE using a MASTER_PHONE, used to issue commands via SMS (As I mentioned earlier, no more buttons). When SmartCarBuddy recognized the PASSCODE, the MASTER_PIC will extract the MASTER_PHONE number and save it to the onboard eeprom, and an acknowledge message will be sent back to you… “OK! YOUR NUMBER SAVE!”
Simple isn’t it? You are now the USER and can issue all the USER commands via SMS.
NOTE: Sending the DEFAULT PASSCODE will always update the Mobile number regardless whoever send the PASSCODE, and others can control it. To avoid this please read the next step.
The next step to do is change the default PASSCODE. Otherwise I know your PASSCODE! Lol!
Here are the USER COMMANDS via sms:
ARMED ALARM ………. This will Armed SmartCarBuddy and enable sms messaging.
DISARMED ALARM…… This will Disarmed SmartCarBuddy and disable sms messaging
RELAY ON ……………… This will energized the onboard relay
RELAY OFF…………….. This will de-energized the onboard relay
XXXXXXXX NEW ……… This will change your passcode. Where X is your new passcode . (Combination of Capital or Small letters and numbers are accepted)
SLDR SETUP …………….. This will change the Default parameters
Where (S) Scan Delay of tilt switch [3SEC DEFAULT]
(L) Long Alarm Delay [6SEC DEFAULT]
(D) Danger Status Counter [3 DEFAULT]
(R) Relay Function (0 DEFAULT)
Example: 4520 SETUP
| | | | |
| | | | Inform SmartCarBuddy this is a Setup Command
| | | Auto or Manual RELAY function … (see Table 1)
| | Danger Status (How many short alarm before activating the Long Alarm)
| Duration of Long Alarm
Scan Delay (This is the duration after each Short Alarm)
GEBARU ………………… See related explanation
DEFAULT ……………….. Set to original setting
Don’t forget that all the User Commands including the “NEW” of Change Passcode are all in capital letters and no trailing or leading white space character(s).
To change the PASS CODE send an 8-character passcode (including space) followed by “NEW”
Note: Pass Code is case sensitive. “NEW” should be always in capital letter.
MYMOBILE is an 8 character (no spaces)
MyMobile is an 8 character (no spaces)
MY MOBIL is an 8 character (including the space)
EXAMPLE: Your new PASSCODE is MYMOBILE or mymobile
Type…. mymobile NEW and send it to SmartCarBuddy
| |
| ADD THIS LINE (Note: No space after NEW)
Your new Pass Code
mymobile(space)NEW
Acknowledge will be “OK! NEW PASSCODE SAVE” if your mobile number is registered.
PASSCODE is your key to register your MASTER_PHONE Number. And your MASTER_PHONE Number is an added security for hackers would be. When your MASTER_PHONE is not registered you cannot change the PASSCODE nor you can use the USER COMMAND, because in doing so, the UNIT will treat the sent USER COMMAND as a garbage. Only the PASSCODE won’t verify your MASTER_PHONE number. This is to allow the USER to use others mobile phone (for emergency situation) or simply you want to change your MASTER_PHONE sim card and that would save your new number in SmartCarBuddy onboard eeprom. So please take care of your PASSCODE.
AVOID FREQUENT CHANGING OF PASSCODE. USE THE “GEBARU” COMMAND IF YOU FORGOT YOUR PASSCODE. THESE WILL LENGHTEN THE LIFE OF THE ONBOARD EEPROM.
To ARMED the SmartCarBuddy simply send “ARMED ALARM”
Acknowledge is “OK! ALARM ARMED!” if your mobile number is registered
BI-LED RED color will lit.
To DISARMED it … send “DISARMED ALARM”
Acknowledge is “OK! ALARM DISARMED!” if your mobile number is registered
To activate the relay … send “RELAY ON”
Acknowledge is “OK! RELAY ON!” if your mobile number is registered
To de-activate the relay … send “RELAY OFF”
Acknowledge is “OK! RELAY OFF!” if your mobile number is registered
If you forgot your PASSCODE! Hmmnnn, you’re too old! Lol!
Send “GEBARU”
SmartCarBuddy will send you back your forgotten PASSCODE, again if your mobile number is registered.
If you find yourself going somewhere, just type DEFAULT and all the default setting are set.
Actually the MASTER_PIC read the message from the SLAVE phone, filtered it (see below) and extracts the last 8 byte of the message in PDU Mode, and the MASTER_PHONE number in text mode. Then compare the MASTER_PHONE number if it is a valid user. If valid, the MASTER_PIC compare the extracted 8 byte (User command) and is executed as requested. I supposed that that is the right approach and it looks more professional rather than compare it in TEXT mode. (IF HELLO=HELLO THEN…)
Unfiltered received message in PDU FORMAT: (CR = ^ , LF = * )
After Filter Done in PDU:
+CMGR: 1,,26^*0791695650309299040C9169562014100600004090611132602107D0E493F904C500
| | | | | | | | | | | | |
| | | | | | | | | | | | 8Byte Code
| | | | | | | | | | | Here is the message
| | | | | | | | | | Length of the message
| | | | | | | | | Time/Date
| | | | | | | | Data Coding Scheme
| | | | | | | Protocol Identifier
| | | | | | Sender Number (In Decimal Octets)
| | | | | Type of sender address (91=International)
| | | | Sender Address Length
| | | First Octet of this SMS-DELIVER MESSAGE
| | Service Center Number (In Decimal Octets)
| Service Center Type of Address (91=International)
Length of Service Center Information (In this case 7 Octets)
1111111111222222222233333333334444444444555555555566666666667777777
01234567890123456789012345678901234567890123456789012345678901234567890123456
+CMGR: "REC READ","+966502410160",,"04/09/16,11:23:06+12"*^PIOLO V1*^*^OK*^###
| |
Mobile Number Message
The unit continuously monitors the SENSORS for any untoward vibrations. Next the INBOX memory location 1 of SLAVE_PHONE is check for a presence of new message (SMS). If the message is too long, the MASTER_PIC will treat it as an invalid message and delete it from the inbox including memory 2. This is to insure that the first 2 memory of the SLAVE_PHONE SIM card is always clear for incoming sms messages. I say 2-memory location because new generation mobile phone now can send 4 pages of SMS. And you don’t want your mobile to be flooded with SMS. That is when you use an old sim card and your unaware friends send you a bulk of messages. Most often I receive a message mainly by mistake or some promotions from the network. That’s cleared the issue.
The SIREN will activate in 1 sec interval when the sensors status change within the predefined period set by the parameters , and a COUNTER start to increment. If the disturbance disappeared before the COUNTER reach the maximum count, the COUNTER is reset to zero and back to normal scanning. But when the COUNTER reach the max count (Set by parameters) , the unit goes in danger status and sound the SIREN for 6 seconds and send a message to the user. “ALERT! DANGER STATUS!”
Now it is your decision what step you should do after receiving the ALERT MESSAGE.
TIP: You can activate the onboard relay… say … connected to your Car Ignition relay or Head Light and Horn. Or maybe connected to a Stun Gun. Or you may deactivate the alarm by issuing “DISARMED ALARM”, leaving your car without protection. The choice is yours.
We can use Class 0 and Flashing Message of PDU Format, but due to limited memory of the PIC I used, we cannot implement it here. Flashing messages will double the length of the message.
What a nice SET-UP. All you have to do is connect it to a car battery, connect your SLAVE_PHONE, and send your Passcode and Parameters. All the set-up is done by the MASTER_PIC. It will even monitor the SLAVE_PHONE battery and remind you via sms when the battery is in critical level. The next time you connect a SLAVE_PHONE, SmartCarBuddy acts like a Plug And Play Unit.
Well! That’s all! Who say’s Mobile Phones are for Human’s only. It can be a SMART CAR BUDDY. This project could not be made possible without DLR3 cable. Mbus protocol is way beyond my capability for the time being. And of course, without a genuine compiler, life won’t be easier and that is PROTON PLUS V2.1.5 of CROWNHILL ASSOCIATES.
Many thanks to ADRIAN DABROWSKI http://www.atrox.at
CONTACT: [email protected]
Can I copy your Site for my own?
Please write a small summary on your Site (if you like) and link for the rest to me.
I've spent a lot of time in investigating and testing the whole matter. Honor it that way. Thank you.
IMPORTANT: DO IT AT YOUR OWN RISK! IF YOU DON’T KNOW SIMPLE ELECTRONICS THEN FORGET ABOUT THIS UNIT.
THIS IS FOR PERSONAL USE ONLY
COMMERCIAL APPLICATION IS PROHIBITED
It cannot be used in any condition for business or commercial use
without explicit permission of the author.
FAULT FINDING
IF NO COMMUNICATION LINK:
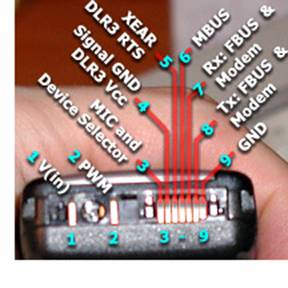
CHECK YOUR CIRCUIT, A SMALL MISTAKE WILL EITHER DAMAGE YOUR MOBILE PHONE OR THE UNIT. A HAIRLINE SHORT ON THE PRINTED CIRCUIT BOARD WILL MAKE YOUR BRAIN SQUEEZED. DATA CABLE MUST BE AS SHORT AS POSIBLE.
MAKE SURE TO FOLLOW THE DATA CABLE CONNECTIONS. SEE THE DIAGRAM,
USE A DVM FOR SHORTS!
MAKE IT A HABBIT TO TURN OFF YOUR PHONE BEFORE CONNECTING IT TO SmartCarBuddy
AS A RULE, DON’T CHANGE YOUR PASSCODE AND PARAMETERS UNNECESSARY. REMEMBER THAT FREQUENT WRITE TO EEPROM WILL EASILY REDUCE ITS LIFE.
PLEASE EMAIL ME ABOUT YOUR SUCCESSFUL BUILT.
I would appreciate it if you sent me a short email to tell me where you use it. Even better, if you've modified my code to improve it in some way, please contact me.
I make the PCB using the old version of Number One System, EASYPC for DOS and Orcad V10. Email me if you want the hardcopy.
TABLE 1: RELAY FUNCTION
DATA VALUE |
SHORT ALARM |
LONG ALARM |
MANUAL VIA SMS |
0 |
NO |
NO |
YES |
1 |
RELAY FOLLOWS THE FUNCTION OF SHORT ALARM |
NO |
YES |
2 |
RELAY FOLLOWS THE FUNCTION OF SHORT ALARM |
RELAY FOLLOWS THE FUNCTION OF LONG ALARM |
YES |
3 |
NO |
RELAY FOLLOWS THE FUNCTION OF LONG ALARM |
YES |
4 |
NO |
RELAY FOLLOWS THE FUNCTION OF LONG ALARM BUT WILL STAY ON UNTIL SET OFF VIA SMS |
YES |
BI LED FUNCTION |
|
GREEN LED |
|
BLINK |
STATUS |
1 |
OFFLINE |
3 |
ONLINE |
RED LED |
|
ON |
ARMED |
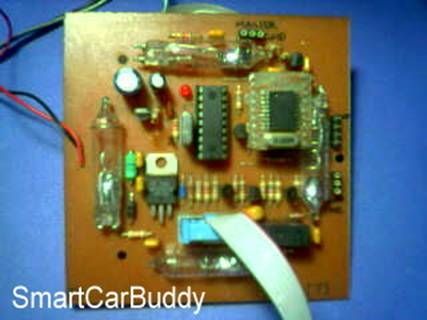
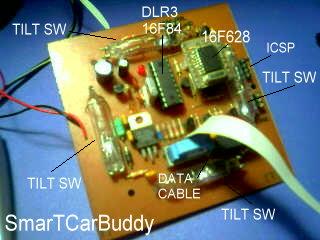
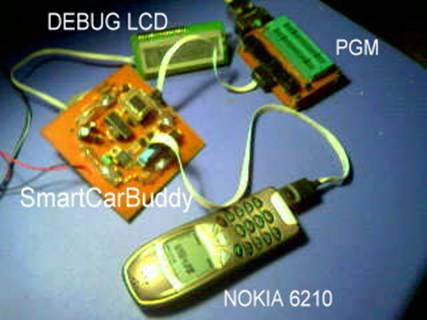
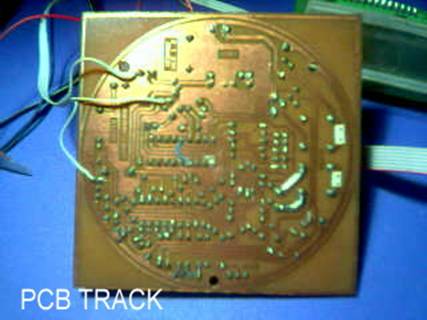
Lastly I will leave you with some pictures and the circuit!
Crownhill's Proton Plus Compiler is a part of the Proton Development Suite - A suite of British-developed applications enabling fast development of PICmicro's using the PICBASIC Language.
For more information on the Proton Development Suite, please visit www.picbasic.org